While preparing an RTD for a Revision, you can open the Participating Trainee Detail for a trainee by clicking the trainee's hyperlinked name. The Participating Trainee Data for the selected person is grouped into panels. Use the  Expand button and Edit buttons and links to display and edit the information as detailed below.
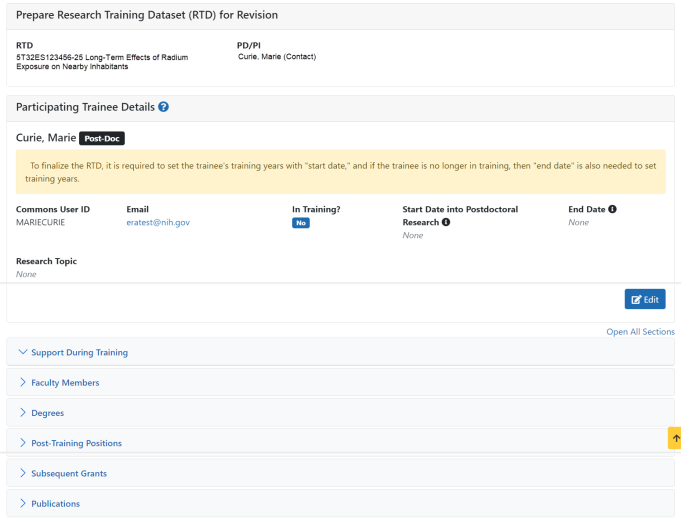
IMPORTANT: The information displayed in the trainee detail is comprised of information pulled from the trainee's eRA Commons Personal Profile, where available. However, updates made to the xTRACT trainee detail will not update that trainees Personal Profile in Commons.
Trainee Data
Use the View link in the Trainee Data panel of the Participating Trainee Detail to display the following read-only information, as applicable:
- Person ID or Commons ID
In Training Data
Use the View link in the In Training Data panel of the Participating Trainee Detail to display in training data as described below. Use the Edit button to open the fields in a pop-up for editing.
- In Training
- Type
- Research Topic
- Start Date
- Current Degree-Granting Program for a Predoctoral trainee
- Postdoctoral Research for Postdoctoral trainee
- End Date (when Trainee Left Program)
NOTE: In order to finalize the RTD for an RPPR, all trainees must have a start date in the In Training Data section. Additionally, trainees with No selected for In Training status must have an end date.
Faculty Members
Displays the participating faculty added to the RTD.
To add faculty, select the Add Faculty Member button.
NOTE: Up to two faculty members may be associated with a student. If there already two faculty members listed, then the Add Faculty Member button does not display. To change a faculty member, delete the appropriate one first and then add the new one.
- Use the parameters on the Search for Person(s) window to find the faculty member.
 In the Search for Faculty screen, uncheck the box titled Search for persons who have a Commons affiliation with my institution to search for persons outside of your institution.
NOTE: You must enter a Commons ID, Person ID, or Last Name to perform a search.
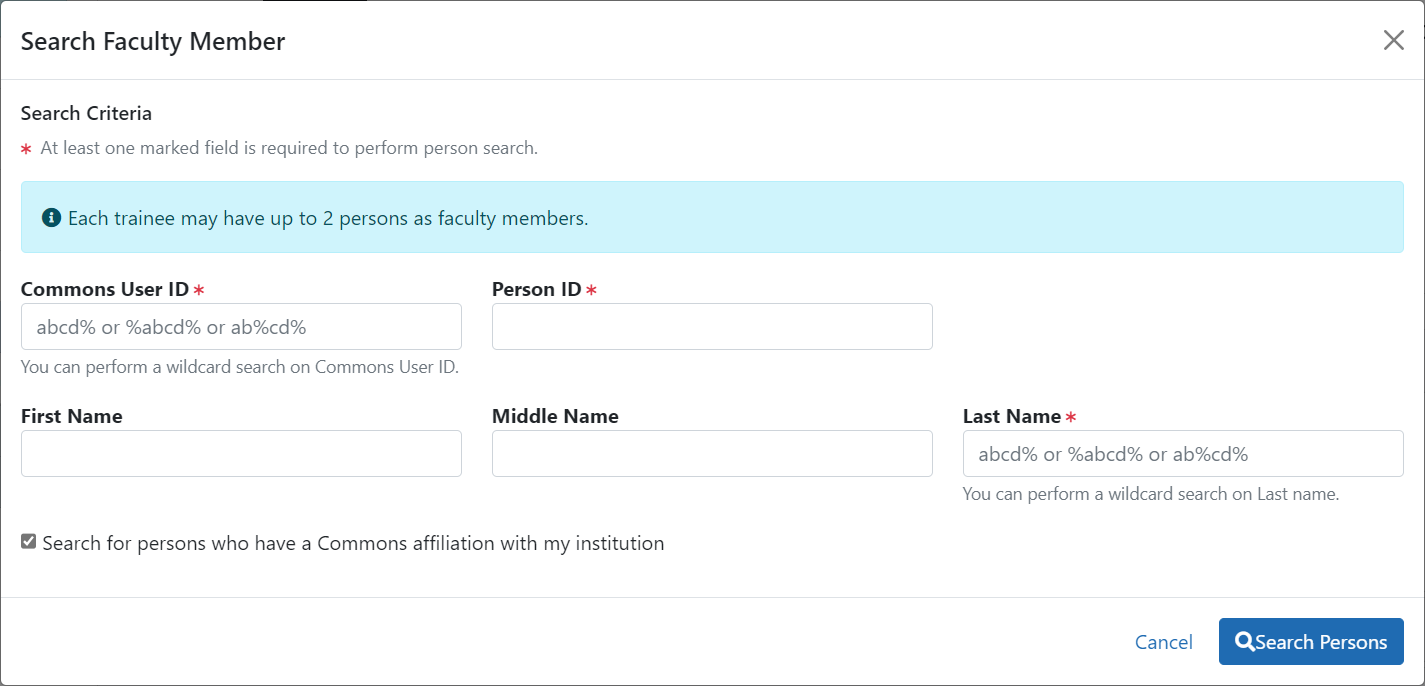
- Select the Search Persons button. All matching records display in the Person(s) table.
- In the Persons table, select the Add to RTD check box for the person to add to the RTD.
- Click the Add Person(s) button.
- (Optional) Repeat the steps above to search for and add other faculty as necessary.
NOTE: Once two faculty members are added, the ability to add more is disabled. You must remove a faculty member before you can add a different one.
To remove a faculty member from the RTD, select the Delete link in the Action column.
Support During Training
NOTE: This section applies to pre-doc and and post-doc trainees only.
Sources of support, both within and outside of NIH, can be maintained in this section. Click on the collapsed panel to display the information.
After a start date has been added for the trainee in In Training Data, the Training Years (TYs) will be displayed as read-only with corresponding abbreviations for funding sources in Support During Training.
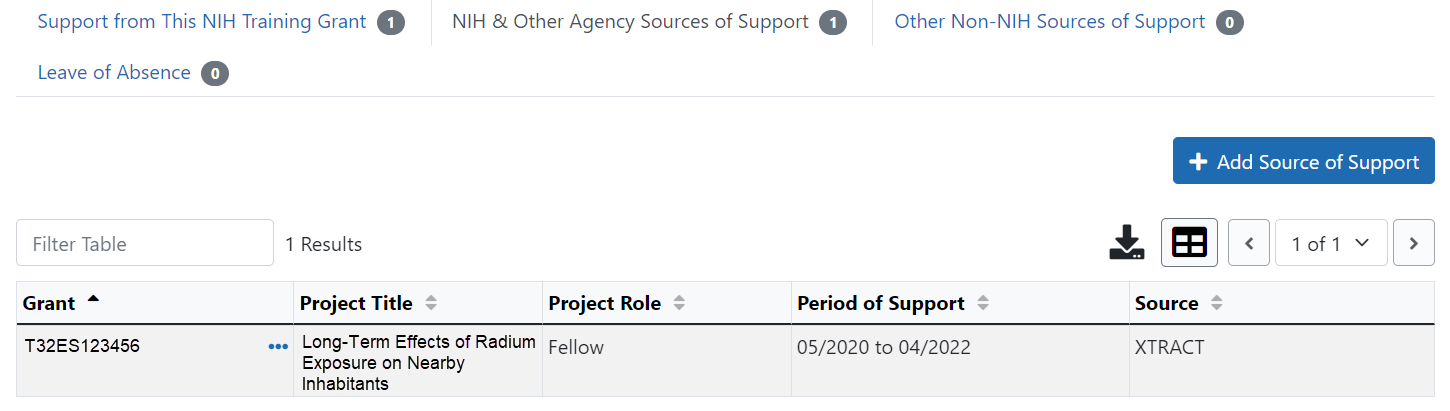
This NIH Training Grant
Includes the NIH Grant number , Project Title, Period of Support.
Click the Add This NIH Source of Support to add support from This NIH Training Grant. Enter the Start of Funding and End of Funding. To remove support from This NIH Training Grant, select Delete All from This NIH Funding Source of Support.
NIH Sources of Support
NIH & Other Agency Sources of Support include the Grant number, Project Title, Project Role, Period of Support, and Source.
IMPORTANT: You cannot delete training grant appointments that are reported from xTrain.
To add additional NIH or Other Agency support:
- Enter Start of Funding and End of Funding to indicate the dates of this person's involvement.
- Click the Save and Exit button.
- Click the
 three-dot ellipsis button and select Edit to modify the source of support.
 -
(Optional) To remove the source of support, click the
three-dot ellipsis button and select Delete.
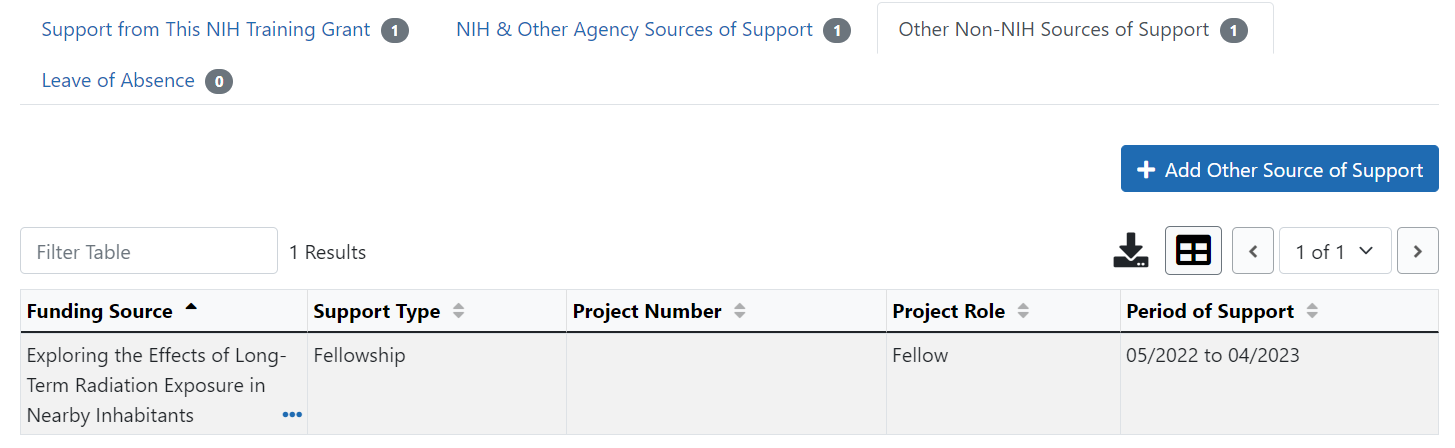
Other Sources of Support
Other non-NIH sources of support include Funding Source, Support Type, Project Number, Project Role, and Period of Support.
To add a source of support:
-
To search:
- Enter search criteria in the fields and click the Search Funding Sources button.
- Click the
 Select this Funding Source button for the correct project. The Enter Source of Support Details screen is displayed.
 - Select the trainee's role from the Role during funding drop-down. If you select Other, enter a description in the Other role description field.
- Enter Start of Funding and End of Funding to indicate the dates of this person's involvement.
- Click the Save and Exit button.
- To create a new source of support:
- Perform a search, which displays the information box.
- In the Information box (at the top or bottom of the list), click the create a new funding source here link.
- Complete the fields and then click Create Funding Source button.
- Select the trainee's role from the Role during funding drop-down. If you select Other, enter a description in the Other role description field.
- Enter Start of Funding and End of Funding to indicate the dates of this person's involvement.
- Click the Save and Exit button.
Leave of Absence
You can specify a Leave of Absence in this section to account for periods when the trainee remains on the grant but does not receive support from the grant.
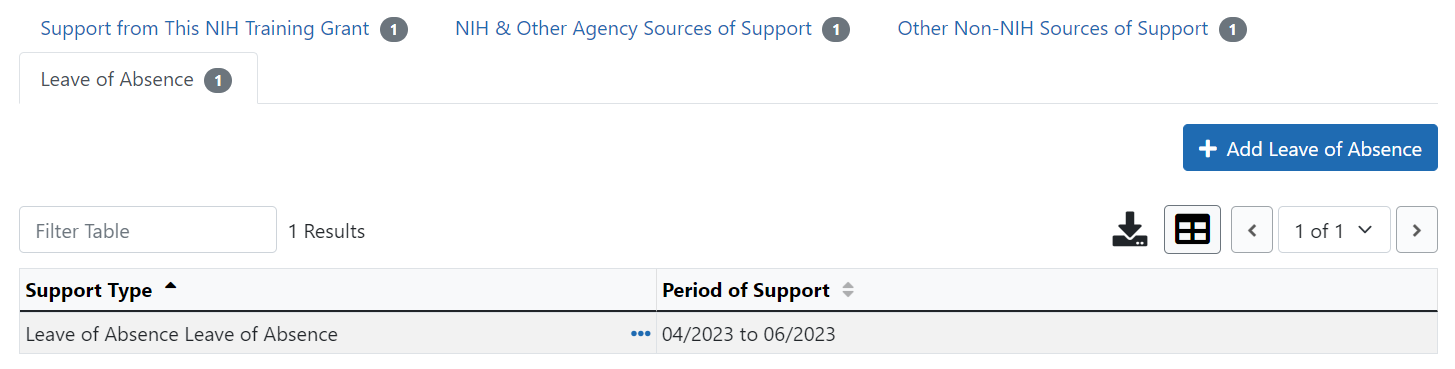
To add a Leave of Absence:
- Click the Add Leave of Absence button.

- In the Add Leave of Absence Period window that appears, enter the start month/year and end month/year for the leave of absence.
- Click Save.
Degrees
xTRACT displays a list of completed degrees and associated data in reverse chronological order, with incomplete degrees following.
To add a degree:
- Select the Add Degree button.
- Update the fields in the Create a New Degree pop-up:
- Degree: Select from the list
- Other Degree Text: Enter the name of the degree if an OTH type of degree was selected.
- Degree Date: Enter in MM/YYYY format
- Terminal Degree: Select the Yes or No as appropriate. When Yes is selected, the terminal degree indicator (This is your terminal degree.) displays next to the degree details in the view. A person can only have one terminal degree.
- Degree Status: Select Completed or In Progress, as appropriate
- Received in Training: Select Yes or No. Up to three degrees can be set as Received in Training.
- Degree Institution: Enter the institution name, one institution per degree. You can search for an institution by selecting the magnifying glass search icon.
- Select the Save button to save your changes.
- Repeat for any additional degrees.
- Select the Close button when finished.
Use the Edit and Delete links in the Action column to update or remove the degree(s) as necessary. Degrees Commons Profile as the Source cannot be deleted.
Post-Training Positions
Displays post-training positions employment information.
To add employment:
- Click the Add Employment button.
- Provide the following information:
- Workforce Sector: Choose the area of employment: Academia, Government, For-Profit, Nonprofit, Other.
- Principal Activity: Primarily Research, Primarily Teaching, Primarily Clinical, Research-Related, Further Training, or Unrelated to Research.
- Position: Type the title of the position.
- Start Date: Type the month/year the position started.
- End Date: Type the month/year the position ended, or leave blank if employed to present time.
- Primary Employment Indicator: Select Yes if this is the main employment; otherwise, select No.
- Full Time Employment Indicator: Select Full-Time or Part-Time
- Current/Initial Employment Indicator: Select Primary Initial if this is the initial employment for the trainee, or select Primary Current if it is the current employment.
- Institution: Enter the institution or start typing to see matches to your typed text.
- Primary Department of Position: Enter the department or start typing to see matches to your typed text. Matches for the selected Institution are shown.
- Click the Save button to save your changes.
Use the Edit and Delete links in the Action column to update or remove the position(s) as necessary. Positions with Commons Profile as the Source cannot be deleted.
Subsequent Grants
If applicable, list subsequent fellowship, career development, or research grant support obtained from any source after the individual completed training. Sources of support submitted on the RTD should list the trainee/student in a role such as PD/PI, co-investigator, faculty collaborator, or staff scientist.
NOTE: xTRACT prepopulates NIH subsequent grant support from xTrain trainee data when available. You cannot delete prepopulated support records from the Subsequent Grants table.
Under NIH and Other Agency Sources of Support on Record, indicate up to five subsequent sources of support to include in the RTD. Each button lets you add a different type of support:
Add Source of Support button: Add grant support received from NIH and other Agency sources that are on record. If you do not know the specific grant, you can indicate support by entering only the activity code and IC.
Add Other Source of Support button: Add sources of grant support received from non-NIH/Agency sources.
On the Subsequent Grants pane, use the Edit and Remove buttons in the Action column to update or remove the funding source as necessary. Mark up to five Include in RTD checkboxes to specify which sources of support will be included in the RTD, which allows only five sources. Once you mark five checkboxes, you cannot mark a sixth.
Sources of support that you include on the RTD must list the trainee/student in a project role such as PD/PI, co-investigator, faculty collaborator, or staff scientist. If you mark the checkbox of a record with a non-supported project role, an error will occur when you mark the checkbox, which states: "Subsequent support may only be reported if the individual had the following role: PD/PI, Staff Scientist, Faculty, or Co-Investigator."
- Enter search criteria to search for existing NIH/Agency grants that provided funding, and then click the Search Funding Sources button.
Red asterisks denote required fields. - In the search results, click the
 Select this Funding Source button for the funding source you want to add.
 - Select the Role During Funding and enter theStart of Funding and End of Funding in mm/yyyy format to indicate the dates of the individual's involvement. click to view)
- Click Save and Exit. Alternatively, if you want to add another funding source, click Save and Add Another Source of Support to be returned to the funding search popup.

If you were supported by an NIH or Agency grant, but do not know the specific grant number, you can instead generically report the trainee's support by activity code and IC only. For example, if you enter T32 for the activity code and CA for the IC, then T32CA will appear on the training table form as the source of support.
- In the Subsequent Grants pane, click the Add Source of Support button. The Add Source of Support popup appears. click to view)
-
In the search criteria, enter an activity code and IC ONLY, and then click the report activity code and IC directly link.
- Select the Role during funding and enter Start of Funding and End of Funding in mm/yyyy format to indicate the dates of the individual's involvement. click to view)
- Click Save and Exit. Alternatively, if you want to add another funding source, click Save and Add Another Source of Support to be returned to the funding search popup.

- In the Subsequent Grants pane, click the Add Other Source of Support button to open the Add Other Source of Support popup.
Search for support or create new funding source:
- Search for support by entering search criteria and then clicking the Search Funding Sources button.
- In the search results, click the Select this Funding Source button for the funding source you want to add.
- If the funding source you are looking for does not appear, find and click the link to create a new funding source here, then manually enter the funding source that you would like to cite. Provide information about the funding source you are creating. Red asterisk fields are required. When finished, click the Create Funding Source and Continue button.


- In the next step, Enter Source of Support Details, select an option from the Role during funding dropdown.
- Enter Start of Funding and End of Funding in mm/yyyy format.
- Click Save.
Publications
List peer-reviewed publications and manuscripts accepted for publication in peer-reviewed journals. For students/trainees, list all publications resulting from their period of training in the participating faculty member’s laboratory or in association with the current training program, through completion of their degree. Do not list publications resulting from work done prior to entering the training program or arising from research initiated after the completion of the program.
Prior to adding publications, add the faculty to which the publications will be associated, using the Participating Faculty section. If faculty are not added prior, you cannot add publications and you get the following message "There are no Faculty Members added to the RTD, you must add the Faculty Member to the RTD in the Participating Faculty section, in order to add publications."
- In the Publications section, click the checkbox titled Check this box if there are no publications for this trainee. NOTE: This button does not appear until you add faculty to the RTD using the Participating Faculty section.
- Select the Faculty Member and Reason for No Publications, and click Save.
- If you change your mind and want to add a publication, clear the checkbox and the Add Publication button reappears.
- In the Publications section, click the Add PubMed Publication button.
NOTE: This button does not appear until you add faculty to the RTD using the Participating Faculty section.
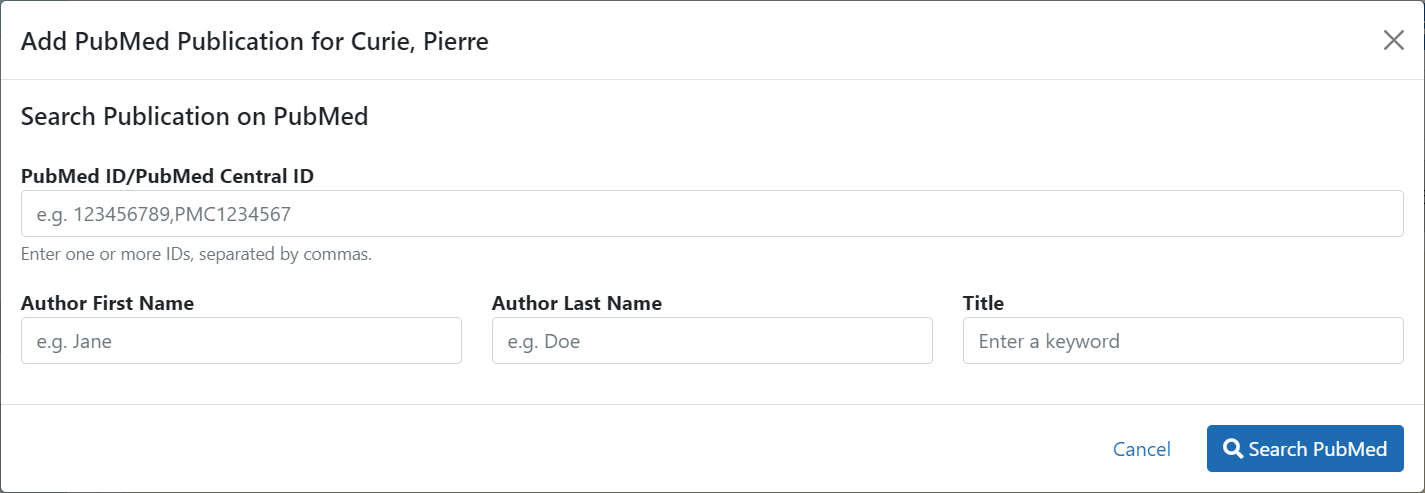
- Enter search criteria using one of the methods below and click its Search button.
- PubMed ID/PubMed Central ID: Enter IDs for articles listed in PubMed or PubMed Central. To search for multiple articles at once, enter a comma separated list of IDs, which can be from either PubMed or PubMed Central. Precede PubMed Central IDs with "PMC" as shown below.
Examples:
a) Enter PMC7679077 to search for a PubMed Central article (PMCID)
b) Enter 32226987 to search for a PubMed article (PMID)
c) Enter PMC7679077, 32226987 to search for both articles at once - Author First Name. Enter all or a portion of the first name; articles with the text you enter here are found.
- Author Last Name. Enter the exact last name; only exact matching last names are found.
- Title. For publication title, enter one or more keywords; only those publications whose titles that contain all keywords are found.
- PubMed ID/PubMed Central ID: Enter IDs for articles listed in PubMed or PubMed Central. To search for multiple articles at once, enter a comma separated list of IDs, which can be from either PubMed or PubMed Central. Precede PubMed Central IDs with "PMC" as shown below.
- To add a publication from search results:
- Mark its Include in RTD checkbox.
- Choose from the Faculty Member drop-down. The faculty members listed are those in the Participating Faculty section of this RTD in XTRACT.
- Choose the current trainee/student that you are editing from the Author dropdown. The list of authors is pulled from PubMed/PubMed Central.
- Click Add Publication(s).
- To search again without saving, click the Back to Search button, enter new search criteria, and click the Search button again.
If you indicate a Faculty Member, an Author, or mark the checkbox of a publication, but omit the rest of the fields, then you will receive the warning on saving: No publications were selected to report on the RTD. This means that the publication won't be added due to insufficient information for the publication. Before saving, be sure to fill out all required fields for a publication record that you want to add.
Instead of searching for PubMed/PubMed Central publications, you can click the Manual Edit Publication button and manually enter all the necessary information to create a citation.
- In the Publications section, click the Add Publication Manually button.
NOTE: This button does not appear until you add faculty to the RTD using the Participating Faculty section. - The Manually Add Publication popup appears.
- In the Add Publication popup:
The information needed to define a citation is shown on the screen -- Title, Journal, Faculty Member, Volume, Inclusive Pages, Year, and Authors. Enter information for all fields that apply, being sure to enter information for the required fields that have a red asterisk.
- You can enter multiple authors to compile a list of all authors of the publication. To add an author, enter the author’s name in the Authors text box and click the Add New Author button.
Repeat to add more authors. As authors are entered, the list of authors is displayed as shown below. Use the controls, which are described onscreen, to re-order the list. Select an author and click the Highlight This Trainee button to indicate which author is the trainee/student for whom this publication is cited:
When finished entering the citation information, click the Review button, which gives you the opportunity to review the citation you entered.
- Click Add to add the manual citation.
The publications you added appear in a table in the Publications section.

Click the three-dot ellipsis button and select Edit Publication or Delete Publication to update or remove a publication.
